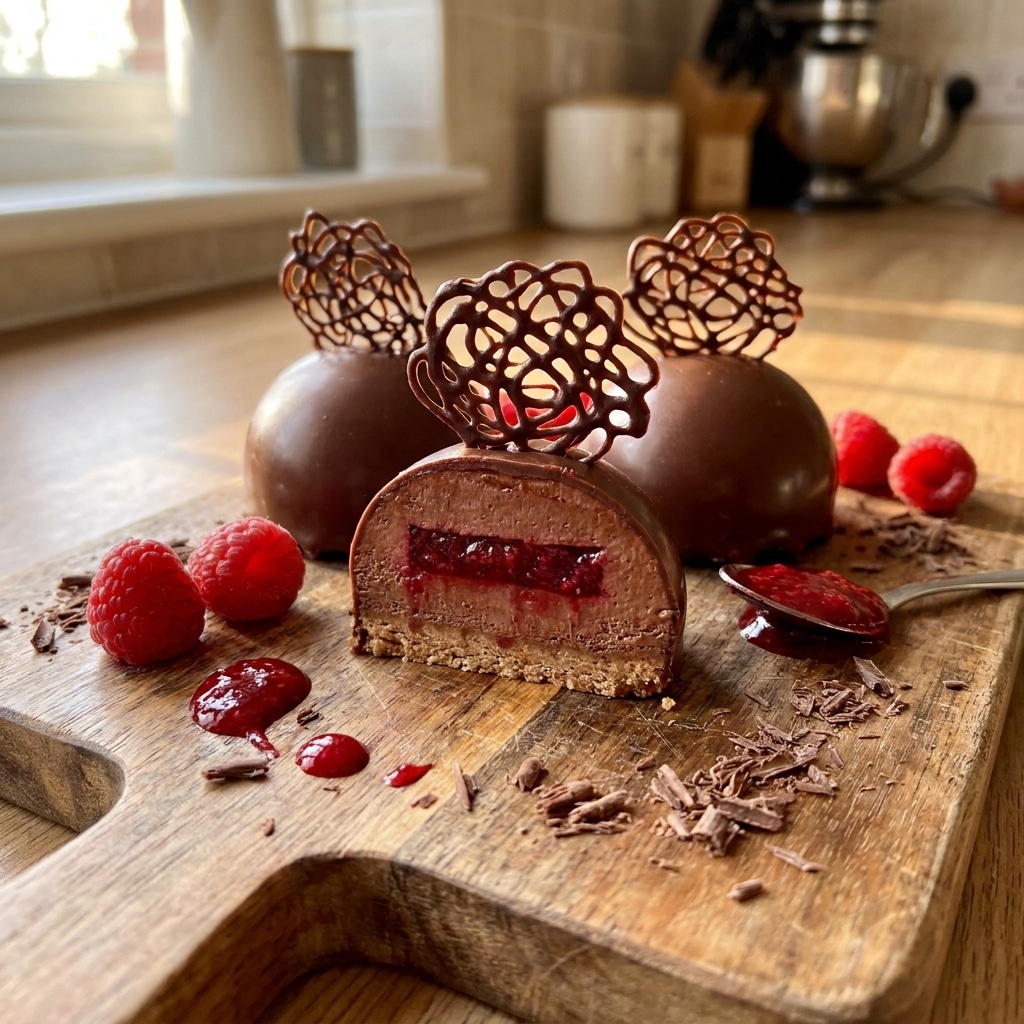
I enjoy this recipe because it delivers a stunning presentation without requiring advanced pastry skills. The smooth cheesecake filling contrasts beautifully with the crunchy chocolate shell, while the raspberry adds a refreshing brightness that keeps the dessert from feeling too heavy. I also appreciate that these domes can be prepared ahead of time, making them ideal for entertaining guests or celebrating special moments.
Ingredients
(Here’s a tip: Check out the full list of ingredients and measurements in the recipe card below.)
For the Chocolate Shell
300 grams dark chocolate
For the Raspberry Cheesecake Filling
225 grams cream cheese
120 ml heavy cream
60 grams powdered sugar
1 teaspoon vanilla extract
100 grams raspberries, pureed and strained
5 grams powdered gelatin
2 tablespoons cold water
For the Base
6 rounds chocolate cake, pre-baked and thinly sliced to fit the molds
Optional Garnishes
Fresh raspberries
Fresh mint leaves
Cocoa powder
Directions
Prepare the Chocolate Shells
I melt the dark chocolate using a double boiler or microwave, stirring until smooth.
Using a pastry brush or spoon, I coat the inside of silicone half-sphere molds with a thin layer of melted chocolate.
I place the molds in the refrigerator for 10 minutes to set.
I apply a second layer of chocolate to strengthen the shells and chill again until completely firm.
Prepare the Raspberry Cheesecake Filling
I sprinkle the gelatin over the cold water and let it bloom for about 5 minutes.
In a mixing bowl, I beat the cream cheese until smooth and creamy.
I add the powdered sugar, vanilla extract, and raspberry puree, mixing until fully combined.
I gently melt the bloomed gelatin and stir it into the raspberry mixture.
In a separate bowl, I whip the heavy cream until soft peaks form.
I carefully fold the whipped cream into the cheesecake mixture until smooth and airy.
Assemble the Domes
I pipe or spoon the raspberry cheesecake filling into each chocolate shell, leaving a small amount of space at the top.
I place a round of chocolate cake over each filled dome and gently press it into place.
I refrigerate the domes for at least 4 hours, or overnight, until fully set.
Once chilled, I carefully unmold the domes and allow them to sit at room temperature for about 10 minutes before serving.
If desired, I garnish the domes with fresh raspberries, mint leaves, or a light dusting of cocoa powder.
Servings and Timing
Servings: 6 domes
Prep Time: 30 minutes
Chocolate Shell Chilling Time: 20 minutes
Cheesecake Filling Preparation: 20 minutes
Chilling Time: 4 hours
Total Time: Approximately 4 hours 40 minutes
Variations
I sometimes use white chocolate instead of dark chocolate for a sweeter flavor profile.
I enjoy substituting strawberries or blackberries for the raspberries.
For added texture, I mix crushed chocolate cookies into the cheesecake filling.
I occasionally add a layer of raspberry jam in the center for a stronger fruit flavor.
I like decorating the domes with chocolate curls or edible gold leaf for an extra-special presentation.
Storage/Reheating
I store the cheesecake domes in an airtight container in the refrigerator for up to 4 days. Keeping them chilled helps maintain the texture of both the chocolate shell and cheesecake filling.
For longer storage, I freeze the domes for up to 1 month. I thaw them overnight in the refrigerator before serving.
Since these are chilled desserts, I do not recommend reheating them. I prefer letting them sit at room temperature for 10 to 15 minutes before serving to soften the filling slightly.
FAQs
Can I use frozen raspberries?
Yes, I often use frozen raspberries. I thaw them first, then puree and strain them to remove the seeds.
What if I do not have silicone dome molds?
I find that silicone molds work best for easy unmolding, but other flexible dome molds can also be used.
Can I make these domes ahead of time?
Yes. I usually prepare them a day in advance since the extra chilling time helps them set perfectly.
Why do I need two layers of chocolate?
I use two layers to create a stronger shell that is less likely to crack during unmolding or serving.
How do I know when the cheesecake filling is fully set?
The filling should feel firm when gently touched and hold its shape when removed from the mold.
Conclusion
I love these Chocolate Raspberry Cheesecake Domes because they combine rich dark chocolate, creamy cheesecake, and vibrant raspberry flavor in one elegant dessert. The crisp shell and smooth filling create an impressive contrast of textures, while the beautiful dome shape makes every serving feel special. Whether I prepare them for a dinner party, holiday gathering, or personal treat, they always deliver a memorable dessert experience.
Elegant Chocolate Raspberry Cheesecake Domes with rich dark chocolate shells and creamy raspberry cheesecake filling. A stunning dessert for special occasions.
Author:Ella
Prep Time:30 minutes
Total Time:4 hours 40 minutes
Yield:6 servings
Category:Dessert, Cheesecake, No-Bake Dessert
Method:Chilling, No-Bake
Cuisine:International, Modern European
Diet:Vegetarian
Ingredients
For the Chocolate Shell
300 g dark chocolate, melted
For the Raspberry Cheesecake Filling
225 g cream cheese, softened
120 ml heavy cream, cold
60 g powdered sugar
1 tsp vanilla extract
100 g raspberries, fresh or frozen, pureed and strained
5 g powdered gelatin
2 tbsp cold water
For the Base
6 rounds chocolate cake, thinly sliced to fit dome molds
Optional Garnishes
Fresh raspberries
Fresh mint leaves
Cocoa powder
Chocolate curls
Freeze-dried raspberry crumbs
Instructions
Prepare the Chocolate Shells
Melt the dark chocolate using a double boiler or microwave in 20-second intervals, stirring until smooth.
Using a pastry brush or spoon, coat the inside of six silicone half-sphere molds with a thin layer of chocolate.
Refrigerate for 10 minutes until set.
Apply a second coat of chocolate to reinforce the shells.
Chill again until completely firm.
Prepare the Gelatin
Place the gelatin powder in a small bowl.
Add the cold water and allow it to bloom for 5 minutes.
Make the Raspberry Cheesecake Filling
Beat the cream cheese in a large bowl until smooth and creamy.
Add the powdered sugar, vanilla extract, and raspberry puree.
Mix until fully combined and smooth.
Incorporate the Gelatin
Gently melt the bloomed gelatin in the microwave for a few seconds or over warm water until liquid.
Stir the melted gelatin into the raspberry cheesecake mixture until evenly incorporated.
Fold in the Whipped Cream
In a separate bowl, whip the heavy cream until soft peaks form.
Gently fold the whipped cream into the raspberry cheesecake mixture until light and airy.
Fill the Domes
Transfer the cheesecake filling to a piping bag.
Pipe the filling into each chocolate shell, leaving a small space at the top.
Place a chocolate cake round onto each dome and gently press it into the filling to create a flat base.
Chill and Set
Refrigerate the domes for at least 4 hours, or preferably overnight, until fully set.
Unmold and Serve
Carefully remove the domes from the silicone molds.
Allow them to sit at room temperature for 10 minutes before serving.
Garnish with fresh raspberries, mint leaves, cocoa powder, or chocolate decorations if desired.
Notes
Use high-quality dark chocolate (60–70% cocoa) for the best flavor and structure.
Straining the raspberry puree removes seeds and creates a silky filling.
Ensure the chocolate shell is fully chilled before adding the filling.
Silicone molds make unmolding much easier and help achieve a smooth finish.
For a more intense raspberry flavor, add a few drops of raspberry extract.
These domes can be made up to 2 days in advance and stored refrigerated.


