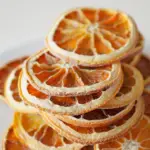
How to Make Dried Orange Slices
Learn how to make dried orange slices using an oven or dehydrator for beautiful citrus rounds perfect for recipes, decorations, and food preservation.
- Prep Time: 5 minutes
- Total Time: 6 hours 5 minutes (approximate)
- Yield: Varies (based on number of oranges used)
- Category: DIY, Preservation, Snack, Decor
- Method: Dehydrator or Oven
- Cuisine: Homemade / Natural Craft
Ingredients
Oranges or other citrus fruit (preferably organic)
Instructions
1. Prep the Oranges:
Rinse oranges well and dry with a clean towel.
Cut off the tops and bottoms, then slice into thin rounds (~1/4 inch or thinner).
Blot with a towel to remove excess juice for faster drying.
Drying Option 1 – Dehydrator Method:
Arrange orange slices in a single layer on dehydrator trays.
Set dehydrator to 130°F or the “fruit” setting.
Dry for 6–8 hours, checking after 4 hours and every 45 minutes after.
Slices are done when they feel dry and snap when bent.
Let cool before storing.
Drying Option 2 – Oven Method:
Line a baking sheet with parchment paper or use a wire rack over a baking sheet.
Arrange orange slices in a single, non-overlapping layer.
Set oven to lowest setting (typically 170–200°F). No need to preheat.
Bake for 2 hours, then flip slices.
Continue drying for another 2–3 hours, or until fully dry.
Let cool, then store.
Notes
Drying time varies based on slice thickness, humidity, and equipment.
Dried slices should feel crisp and brittle when done.
You can also use an air fryer with a dehydrator setting—just monitor the temp carefully.
These slices are not just for decor—they make great garnishes for tea, cocktails, and baked goods too!
Find it online: http://elladishes.com/how-to-make-dried-orange-slices/
